Contents
- Introduction
- Basic Code
- Variance
- Halftone
- Abstraction 1: Squares
- Abstraction 2: Lines
- Abstraction 3: Text
1. Introduction
The following code will translate the pixel information from images into geometrical shapes, such as dots, lines, circles etc. The process is similar to the reprographic technique of halftone, which simulates continuous tone imagery through the use of dots, varying either in size or in spacing. Where continuous tone imagery contains an infinite range of colors or grays, the halftone process reduces visual reproductions to an image that is printed with only one color of ink, in dots of differing size (amplitude modulation) or spacing (frequency modulation). This reproduction relies on a basic optical illusion: the tiny halftone dots are blended into smooth tones by the human eye.
The same kind of information can however also be used to generate G-Code for CNC milling machines or laser cutters. Check out Mathias Bernhard’s fPix (http://www.mathiasbernhard.ch/fpix-pixel-art) or Design Machine by Sebastian Bächer, Hans Sachs and Cornelia Vollmert (http://design-machine.com).
Instructions
Manuel Kretzer
Duration
3 hours
Level
Intermediate
Category
2. Basic Code
Processing can display .gif, .jpg, .tga, and .png images. Before an image is used, it must be loaded with the ‘loadImage()’ function. The ‘PImage’ class contains fields for the width and height of the image, as well as an array called ‘pixels[]’ that contains the values for every pixel in the image (https://processing.org/reference/PImage.html). In order to load an image into our sketch we therefore first have to declare a new PImage class, which we do at the very beginning of our script. We simply call it ‘img’.
PImage img;
We then start with the structure of our program, being the ‘setup()’ and ‘draw()’ functions. Within ‘setup()’ we define our canvas size and load our image using ‘loadImage()’. To load correctly, images must be located in the data directory of the current sketch. Alternatively, the file maybe be loaded from anywhere on the local computer using an absolute path or the filename parameter can be a URL for a file found on a network. Note that CMYK images are not supported. (https://processing.org/reference/loadImage_.html). The size of the loaded image in pixels must be identical to the size of the canvas, in our case 500 x 500 pixels.
void setup() {
  size (500, 500);
  img = loadImage(“bowie.jpg”);
}
If we were to display our image on the screen we could now simply use
image(img, 0, 0);
However, as we are not interested in showing the original but a computationally adapted version of the picture, we move on to the ‘draw()’ function during which we modify the pixel information.
void draw() {
Since ‘draw()’ will run continuously until the program is stopped we need to redraw the background each time at the beginning of the loop.
background(255);
We then set up two for loops, one for pixels in x-direction of the screen and one for pixels in y-direction. We set 5 as stepsize, since we otherwise would be loading every pixel, which would just result in the original image.
  for (int x = 0; x < width; x+= 5) {
    for (int y = 0; y < height; y+= 5) {
Embedded in these loops we use ‘get()’ to read the color of the pixels at the respective x and y coordinates and store it into a ‘color’ variable
color c = img.get(x, y);
Now we use the color to tint our stroke, set the stroke thickness as smaller than the assigned stepsize and draw a point at the respective x and y coordinates.
      stroke(c);
      strokeWeight(4);
      point(x, y);
    }
  }
}
The complete code will look like this (sketch_05_01):
PImage img;

void setup() {
  size (500, 500);
  img = loadImage(“bowie.jpg”);
}

void draw() {
  background(255);
  for (int x = 0; x < width; x+=5) {
    for (int y = 0; y < height; y+=5) {
      color c = img.get(x, y);
      stroke(c);
      strokeWeight(4);
      point(x, y);
    }
  }
}
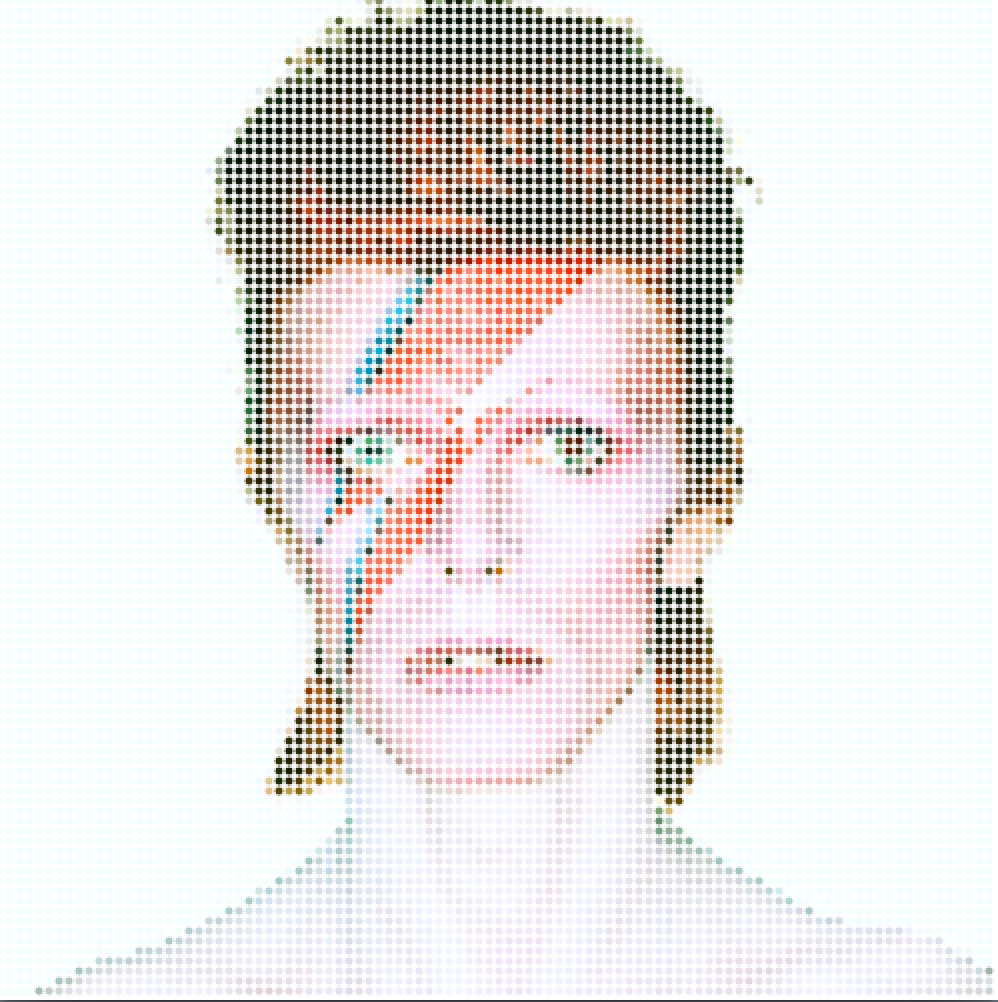
Getting the color of a single pixel with ‘get(x, y)’ is easy, but not as fast as grabbing the data directly from ‘pixels[]’. The equivalent statement to ‘get(x, y)’ using ‘pixels[]’ is ‘pixels[y*width+x]’. To improve our code we therefore switch
color c = img.get(x, y);
with
color c = img.pixels[y*img.width+x];
3. Variance
Instead of just displaying each dot equally we now want to vary the dot size depending on the brightness value of the respective color.
float b = brightness(c);
We now map the values, which are in between 0 and 255 to the size of our dots, which should be in between 1 and our stepsize.
b = map(b, 0, 255, 5, 1);
In order simplify the program’s structure we introduce the global variable ‘Steps’, which needs to be called at the beginning of the code.
int steps = 5;
Accordingly the following parts will change to
  for (int x = 0; x < width; x+= steps) {
    for (int y = 0; y < height; y+= steps) {
      b = map(b, 0, 255, steps, 1);
Finally we replace
strokeWeight(b);
The current code now looks like (sketch_05_02):
PImage img;
int steps = 5;

void setup() {
  size (500, 500);
  img = loadImage(“bowie.jpg”);
}

void draw() {
  background(255);
  for (int x = 0; x < width; x+= steps) {
    for (int y = 0; y < height; y+= steps) {
      color c = img.pixels[y*img.width+x];
      float b = brightness(c);
      b = map(b, 0, 255, steps, 1);
      stroke(c);
      strokeWeight(b);
      point(x, y);
    }
  }
}
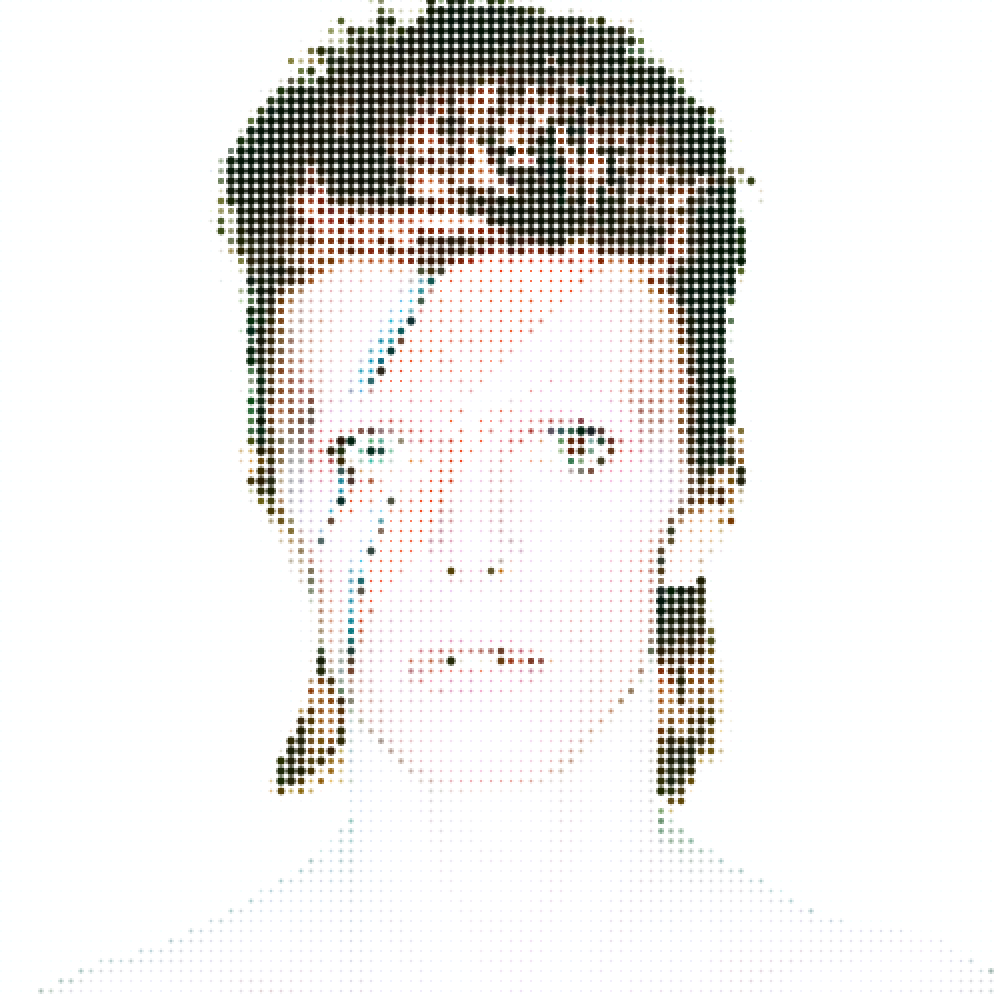
4. Halftone
In order to transform our picture into a halftone image, we simply switch the ‘stroke()’ variable from ‘c’ to ‘0’, black Since we now get a black dot for every pixel location, even though it might not contain valuable information, we introduce a threshold to remove unwanted pixels. We set the threshold variable globally just below ‘Steps’.
float Threshold = 1;
In our ‘draw()’ function we then add a simple conditional, checking whether the brightness value is below the assigned threshold and if so refrain from drawing a stroke. Alternatively the stroke value could be set to 255 instead of 0. The code now looks like this (sketch_05_03):
PImage img;
int steps = 5;
float threshold = 1.0;

void setup() {
  size (500, 500);
  img = loadImage(“bowie.jpg”);
}

void draw() {
  background(255);
  for (int x = 0; x < width; x+= steps) {
    for (int y = 0; y < height; y+= steps) {
      color c = img.pixels[y*img.width+x];
      float b = brightness(c);
      stroke(0);
      b = map(b, 0, 255, steps, 1);
      if (b <= threshold) {
        noStroke();
      }
      strokeWeight(b);
      point(x, y);
    }
  }
}
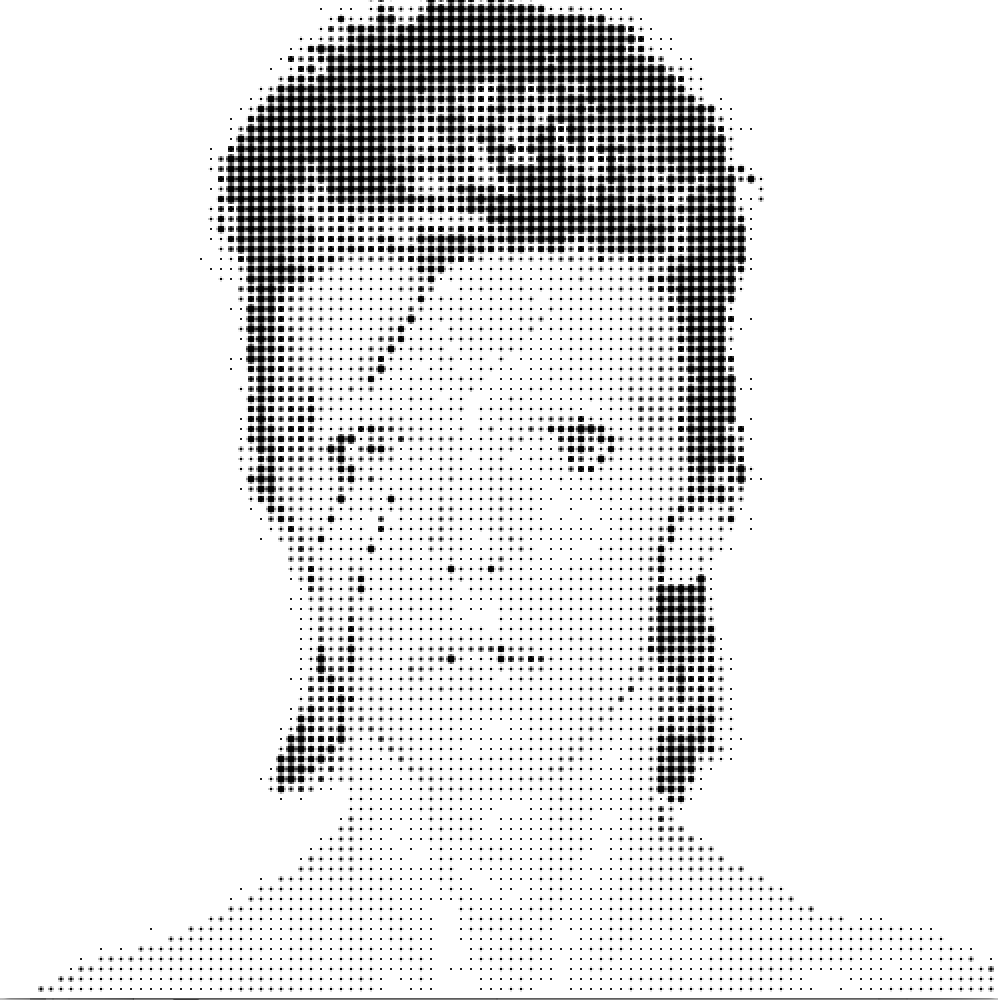
5. Abstraction 1: Squares
If we were to print the image using a pen plotter we need to add some further abstraction. One possibility is to translate the image information into squares of varying sizes and orientations. Since the plotter can only print one color with a set line weight we first have to keep stroke and strokeWeight at fixed values. We then add two new variables of type float to the ‘draw()’ function, ‘rotation’ and ‘size’, which will determine the appearance of our squares. In ‘rotation’ we generate random numbers between 0 and 90 degrees (half PI in radians), in ‘size’ we map the brightness values to numbers ranging from double stepsize to half stepsize.
  float rotation = random(HALF_PI);
  float size = map(b, 0, 255, steps*2, steps/3);
To draw the rectangles we use the ‘pushMatrix()’ and ‘popMatrix()’ functions in combination with ‘translate()’ to move the origin of the canvas. We set ‘rectMode’ to center, rotate each square by it’s random angle and draw the rectangles.
  pushMatrix();
  translate(x, y);
  rectMode(CENTER);
  rotate(rotation);
  rect(0, 0, size, size);
  popMatrix();
Finally we adjust the ‘threshold’ conditional to relate to ‘size’ and adjust the stepsize and threshold variables accordingly. Moreover we add a border frame by adjusting the for loops. The complete code then looks like this (sketch_05_04):
PImage img;
int steps = 9;
float threshold = steps/3;

void setup() {
  size (500, 500);
  img = loadImage(“bowie.jpg”);
  noFill();
  noLoop();
}

void draw() {
  background(255);
  for (int x = steps*2; x < width-steps; x+= steps) {
    for (int y = steps*2; y < height-steps; y+= steps) {
      color c = img.pixels[y*img.width+x];
      float b = brightness(c);
      stroke(0);
      strokeWeight(1);
      // b = map(b, 0, 255, steps, 1);
      float rotation = random(HALF_PI);
      float size = map(b, 0, 255, steps*2, steps/3);
      if (size <= threshold) {
        noStroke();
      }
      pushMatrix();
      translate(x, y);
      rectMode(CENTER);
      rotate(rotation);
      rect(0, 0, size, size);
      popMatrix();
    }
  }
}
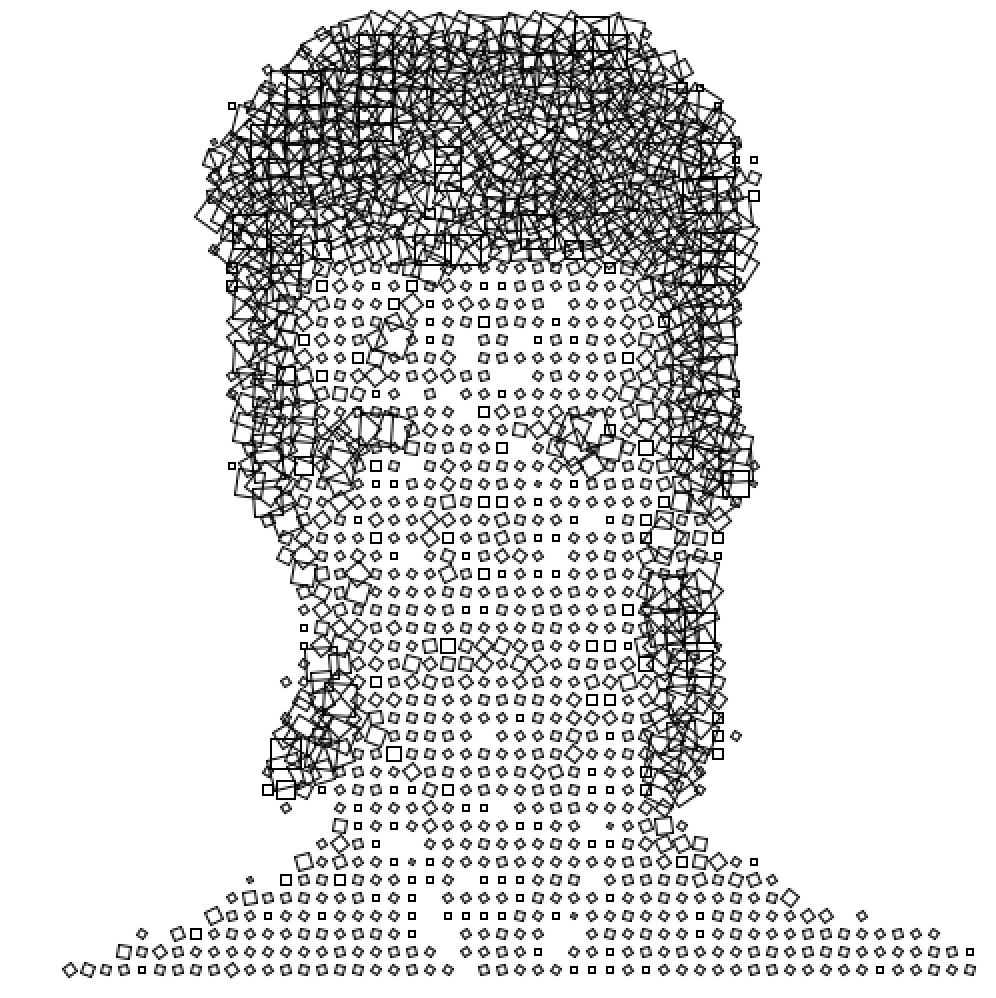
6. Abstraction 2: Lines
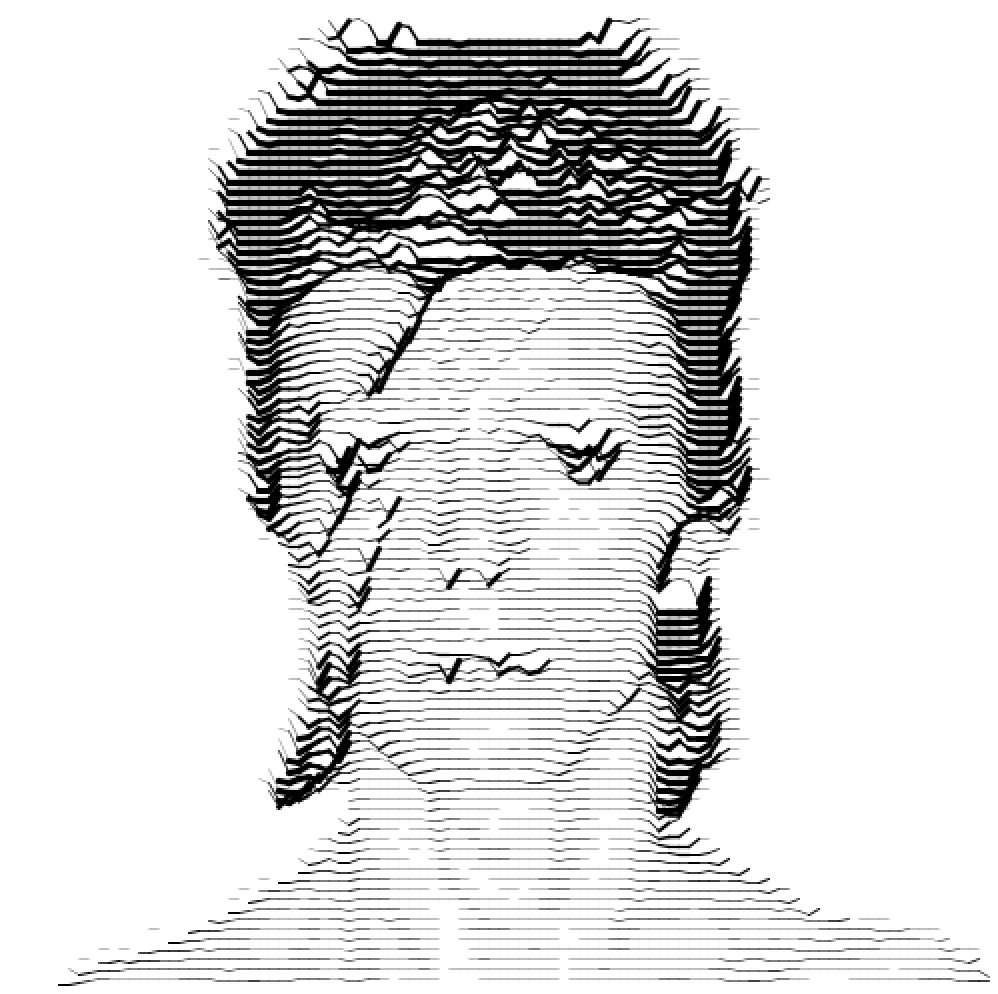
Another possibility is to translate the image information into a line relief. Therefore we first add another global variable called ‘relief’ which will determine the strength of the deviation.
float relief = 10;
In the ‘draw()’ function we then map brightness to the relief.
b = map(b, 0, 255, relief, 1);
To draw lines we need two coordinates, the start and end of the line. We therefore need the values of always the next x coordinate, which is determined by the stepsize.
      color c2 = img.pixels[y*img.width+x+steps];
      float b2 = brightness(c2);
      b2 = map(b2, 0, 255, relief, 1);
Finally we draw our lines.
line(x, y+b, x+steps, y+b2);
The complete code will look like this (sketch_05_05):
PImage img;
int steps = 5;
float threshold = 1;
float relief = 15;

void setup() {
  size (500, 500);
  img = loadImage(“bowie.jpg”);
  noFill();
  noLoop();
}

void draw() {
  background(255);
  for (int x = steps*2; x < width-steps; x+= steps) {
    for (int y = steps*2; y < height-steps; y+= steps) {
      color c = img.pixels[y*img.width+x];
      float b = brightness(c);
      b = map(b, 0, 255, relief, 1);
      color c2 = img.pixels[y*img.width+x+steps];
      float b2 = brightness(c2);
      b2 = map(b2, 0, 255, relief, 1);
      stroke(0);
      strokeWeight(b/4);
      if (b <= threshold) {
        noStroke();
      }
      line(x, y+b, x+steps, y+b2);
    }
  }
}
7. Abstraction 3: Text
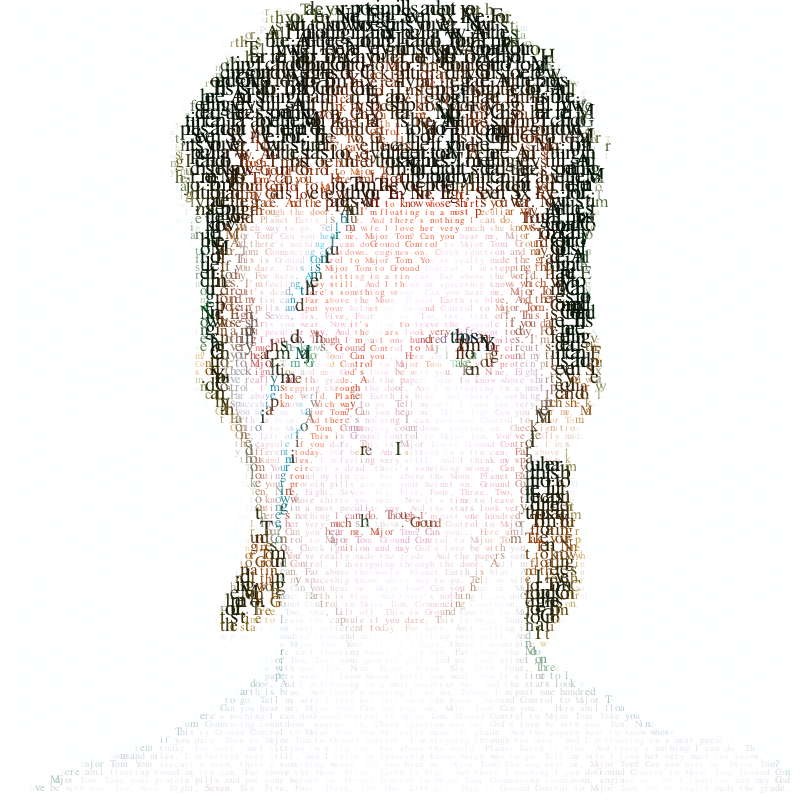
This final example will use the image pixel information and translate it into letters. At the beginning of our code we therefore not only have to create PImage, but in this case also PFont (https://processing.org/reference/PFont.html) as well as loading a string of characters. Since the image has been David Bowie, the string will load the song text of Major Tom.
PFont font;
PImage img;
String text = “Ground Control to Major Tom. Ground Control to Major Tom. Take your protein pills and put your helmet on.
Ground Control to Major Tom. Commencing countdown, engines on. Check ignition and may God’s love be with you. Ten, Nine, Eight, Seven, Six,
Five, Four, Three, Two, One, Lift off. This is Ground Control to Major Tom. You’ve really made the grade. And the papers want to know whose
shirts you wear. Now it’s time to leave the capsule if you dare. This is Major Tom to Ground Control. I’m stepping through the door.
And I’m floating in a most peculiar way. And the stars look very different today. For here. Am I sitting in a tin can. Far above the world.
Planet Earth is blue. And there’s nothing I can do. Though I’m past one hundred thousand miles. I’m feeling very still.
And I think my spaceship knows which way to go. Tell my wife I love her very much she knows. Ground Control to Major Tom.
Your circuit’s dead, there’s something wrong. Can you hear me, Major Tom? Can you hear me, Major Tom? Can you hear me, Major Tom?
Can you... Here am I floating round my tin can. Far above the Moon. Planet Earth is blue. And there’s nothing I can do”;
We then declare a number of global variables, in order to define the appearance of our text.
float fontSizeMax = 14; // max. font size
float fontSizeMin = 8; // min. font size
float spacing = 8; // text line height (x grid)
float kerning = 5; // space between letters (y grid)
int border = 10; // picture frame
int counter = 0; // count text length
Within ‘setup()’ we create our font (https://processing.org/reference/createFont_.html), resize our image to the defined screen size and prevent the ‘draw()’ function from looping.
void setup() {
  size(800, 800);
  background(255);
  font = createFont(“Times”, 10, true);
  img = loadImage(“bowie.jpg”);
  img.resize(width, height);
  noLoop();
}
In ‘draw()’ we first define our grid, load the color and brightness values from all pixels and map it to the maximum and minimum font size we defined. We then load our font and set the fill color.
void draw() {
  for (int y = border+5; y < height-border+5; y+=spacing) {
    for (int x = border; x < width-border; x+=kerning) {
      color c = img.pixels[y*img.width+x];
      float b = brightness(c);
      b = map(b, 0, 255, fontSizeMax, fontSizeMin);
      float fontSize = b;
      textFont(font, fontSize);
      fill(c);
Finally we load each character that we stored in our string using the ‘charAt()’ function, which returns the character at the specified index. Starting from 0 our counter increases by 1 each time the loop is run. Once the counter is equal to the amount of characters stored in our string, which we determine by using the ‘length()’ function.
      char letter = text.charAt(counter);
      text(letter, x, y);
      counter++;
      if (counter == text.length()) {
        counter = 0;
      }
    }
  }
}
As described in the ‘Processing – Generative Design Tutorial: Introduction’ in chapter 20: Export, various methods for saving the created content in different formats, such as pdf, svg or jpg, exist.
The final program looks like this (sketch_05_06):
import processing.pdf.*;
import java.util.Calendar;
PFont font;
PImage img;

String text = “Ground Control to Major Tom. Ground Control to
Major Tom. Take your protein pills and put your helmet on.
Ground Control to Major Tom. Commencing countdown, engines on.
Check ignition and may God’s love be with you. Ten, Nine, Eight,
Seven, Six, Five, Four, Three, Two, One, Lift off. This is Ground
Control to Major Tom. You’ve really made the grade. And the papers
want to know whose shirts you wear. Now it’s time to leave the
capsule if you dare. This is Major Tom to Ground Control.
I’m stepping through the door. And I’m floating in a most peculiar
way. And the stars look very different today. For here. Am I sitting
in a tin can. Far above the world. Planet Earth is blue.
And there’s nothing I can do. Though I’m past one hundred thousand
miles. I’m feeling very still. And I think my spaceship knows
which way to go. Tell my wife I love her very much she knows.
Ground Control to Major Tom. Your circuit’s dead, there’s
something wrong. Can you hear me, Major Tom? Can you hear me,
Major Tom? Can you hear me, Major Tom? Can you... Here am I
floating round my tin can. Far above the Moon. Planet Earth is blue.
And there’s nothing I can do”;

float fontSizeMax = 14; // max. font size
float fontSizeMin = 8; // min. font size
float spacing = 8; // text line height (x grid)
float kerning = 5; // space between letters (y grid)
int border = 10; // picture frame
int counter = 0; // count text length

void setup() {
  size(1000, 1000);
  //beginRecord(PDF, timestamp()+”.pdf”); // remove comments to enable
  background(255);
  font = createFont(“Times”, 10);
  img = loadImage(“bowie.jpg”);
  img.resize(width, height);
  noLoop();
}
void draw() {
  for (int y = border+5; y < height-border+5; y+=spacing) {
    for (int x = border; x < width-border; x+=kerning) {
      color c = img.get(x, y);
      float b = brightness(c);
      b = map(b, 0, 255, fontSizeMax, fontSizeMin);
      float fontSize = b;
      textFont(font, fontSize);
      fill(c);

      char letter = text.charAt(counter);
      text(letter, x, y);
      counter++;
      if (counter == text.length()) {
        counter = 0;
      }
    }
  }
  endRecord();
}

void keyReleased() {
  if (key == ‘s’ || key == ‘S’) saveFrame(timestamp()+”_##.png”);
}

String timestamp() {
  Calendar now = Calendar.getInstance();
  return String.format(“%1$ty%1$tm%1$td_%1$tH%1$tM%1$tS”, now);
}
Sources:
- Generative Gestaltung: Entwerfen, Programmieren, Visualisieren mit Processing” by Hartmut Bohnacker, Benedikt Groß, Julia Laub, Claudius Lazzeroni (Hrsg.) (2009)
- Processing documentation (https://processing.org/tutorials/)
Further Links:
- https://halvtone.com/de/
- http://www.students.tut.fi/~syvajar3/index_en.html
- http://www.evilmadscientist.com/2012/stipplegen-weighted-voronoi-stippling-and-tsp-paths-in-processing/
- http://www.evilmadscientist.com/2012/cnc-halftones-with-ascii-art/
- http://joyofprocessing.com/blog/2011/11/stipple-cam/
- https://www.behance.net/gallery/Faber-Castell/2267302


